Curly Fern Care
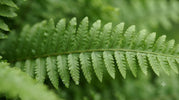
Neurosis fern (Nephrolepis) is a popular houseplant known for its elegant, graceful leaves and air-purifying properties. This plant is not only a beautiful addition to your interior, but also relatively easy to care for. Boston ferns, such as the Green Lady (Nephrolepis exaltata) and the Boston fern, thrive in a humid environment and bring a tropical atmosphere into your home. Would you like to know how to optimally care for your Boston fern? In this blog, we share everything you need to know!
Curly Fern Species
There are various types of curly ferns, but the most popular and easy-to-care-for varieties are:
-
Green Lady (Nephrolepis exaltata): The graceful Nephrolepis Green Lady fern has lush, curled leaves and is known for its air-purifying properties. It grows quickly and remains compact, making it ideal for smaller spaces.
-
Boston fern (Nephrolepis exaltata ‘Bostoniensis’): The Nephrolepis Boston is a robust fern with wider leaves than the Green Lady. This is one of the most popular indoor fern species, partly thanks to its ability to adapt to various light conditions.
Other species such as the Fluffy Ruffles and the Duffii fern are also popular, but require slightly more care and attention.
Watering the Curly Fern
Curly ferns love evenly moist soil. This means you need to water the plant regularly, but without the roots constantly standing in water. A few important guidelines to keep your Boston fern healthy and beautiful: Water regularly: Water the Nephrolepis as soon as the top layer of the potting soil dries out slightly. Never let the soil dry out completely, as this can lead to brown or withered leaves. Use lukewarm and low-calcium water: Preferably water at room temperature or slightly warmer, as cold water can cause a shock to the roots. Tap water with a high calcium content can cause white deposits on the leaves, so rainwater or filtered water is a better alternative.
Proper watering technique: Pour the water slowly and evenly over the soil, not directly onto the leaves, to prevent mold formation. Optionally, use a watering can with a long spout for more control.
Good drainage is essential: Ensure that the pot in which the fern is standing has drainage holes so that excess water can drain away properly. Soil that is too wet can cause root rot. Use a saucer under the pot to catch water, but drain it after a few minutes to prevent the roots from sitting in water.
Water requirements for the Boston fern per season:
- Summer and spring: During warmer periods, the fern needs more water, especially at high temperatures or in dry indoor air. Check the soil regularly and adjust watering accordingly. Autumn and winter: Growth slows down and the plant consumes less water. Water less often, but still ensure the soil does not dry out.
- Light requirements: Partial shade to indirect sunlight is ideal. For example, place the plant a few meters from a north, east, or west-facing window. Avoid a spot directly in front of a sunny south-facing window, unless you use a thin curtain to filter the light.
- Protection against drafts and dry air: Avoid places where drafts are present, such as near open windows or doors. Dry air from radiators can also dry out the leaves and cause brown edges.
- High humidity: A spot in the bathroom can be ideal due to the higher humidity, as long as sufficient daylight enters. Other good locations are kitchens or rooms where the humidity is higher than average.
- Light and shelter: Place the fern on a shady patio, balcony, or under a canopy so that it receives sufficient light but is not in full sun.
- Temperature: Ensure that the temperature does not drop below 10°C, as this can damage the plant. On cold nights, it is wise to bring the plant indoors.
- Watering and humidity: Outdoors, water evaporates faster, so check regularly if the soil is moist enough. Spray the leaves if necessary to prevent drying out.
- Spraying leaves: Use a plant sprayer to regularly mist the leaves with lukewarm, low-calcium water. This helps prevent drying out and brown leaf edges.
- Humidifier: Especially in winter, when indoor air becomes drier due to heating, a humidifier can help maintain ideal conditions.
- Dish with water and pebbles: Place a dish with water and pebbles under or near the plant. Due to evaporation, the humidity around the fern rises.
- Grouping with other plants: Place multiple plants together to create a microclimate with higher humidity.
- The best time to repot a Boston fern is in the spring or early summer, when the plant is actively growing.
- If you notice that the roots are starting to grow out of the bottom of the pot or the plant is absorbing water less well, it is time to repot.
- For a young, fast-growing fern, it may be necessary to repot annually, while older specimens usually need to be repotted every two years.
- Choose the right pot: Use a pot that is 2-4 cm larger in diameter than the current pot. Ensure the pot has drainage holes to drain excess water and prevent root rot.
- Use the right potting soil: Boston ferns love airy, well-draining soil. A mix of general-purpose potting soil with added peat moss, perlite, or coconut fiber is ideal. This helps retain moisture without the soil becoming waterlogged.
- Carefully remove the fern from the old pot: Tilt the pot and gently pull the plant loose. If the roots are stuck, gently squeeze the pot or use a knife to loosen the root ball.
- Shake off excess old soil: Inspect the roots and remove any dead or rotten roots with sharp, clean scissors.
- Place the plant in the new pot: Place the fern in the center of the new pot and fill in the edges with fresh potting soil. Press down the soil lightly, but not too firmly, so that the roots still get enough air.
- Water: Water the plant thoroughly immediately after repotting so that the soil settles and the roots become hydrated.
- The best time to propagate a Boston fern is in the spring or early summer, when the plant is actively growing.
- Taking cuttings is ideal if the plant becomes too large for its pot or if you want to grow new plants.
- By taking cuttings, you give the plant a growth boost, because old, overgrown roots make room for new ones. root growth.
- Carefully remove the plant from the pot: Tilt the pot and carefully pull the fern out. Ensure the roots are damaged as little as possible.
- Divide the root ball: Use a sharp, clean knife or gently pull with your hands to split the root ball into multiple parts. Ensure that each part has sufficient roots and leaves.
- Place the new parts in separate pots: Use fresh, well-draining potting soil and place the new plants in pots with drainage holes. Press the soil down lightly so that the plant stands firmly.
- Water well: Pour water immediately after taking cuttings to help the roots settle and minimize any shock.
- Place the young plants in a warm, humid spot: Choose a spot with indirect light and high humidity, such as a bathroom or a spot with a humidifier. Spray the leaves regularly to prevent drying out.
- Use a plastic bag or mini greenhouse to temporarily increase the humidity for the young cuttings.
- Avoid direct sunlight, as the young roots are still sensitive.
- Give slightly less water than normal in the first few weeks to prevent root rot.
- Spider mites: These can occur in air that is too dry, especially in winter when humidity is often low. Spider mites are small, invisible insects that nest on the underside of the leaves. They cause wilting and spots on the leaves. Combat this by increasing humidity, regularly spraying the leaves with water, and possibly using a mild insecticide.
- Root rot: This can occur if the plant receives too much water or is in a pot with insufficient drainage. Soil that is too wet can cause the roots to rot, which can severely damage the plant. Ensure that the pot is well-draining, that excess water can run off, and that the soil dries out slightly between waterings.
Extra tip – humidifying the air: Boston ferns love high humidity. Spray the leaves occasionally with a plant sprayer or place a saucer with water and pebbles next to the plant to promote evaporation. Especially in winter, when the air is drier due to heating, this helps keep the plant healthy.

Curly Fern Location
A curly fern likes a light, but not too sunny spot. Direct sunlight can burn the leaves, while too little light inhibits growth. The ideal location meets the following conditions:
Burris Fern Outdoors
Burris ferns can also be placed outdoors in the summer, provided they are placed in a sheltered spot where they are not directly exposed to the sun or strong wind. Keep the following points in mind:
Curly fern Humidity
Curly ferns love high humidity, which you can increase in various ways:

Repotting a Curly Fern
A curly fern grows quite quickly and needs to be repotted approximately once every two years. This ensures that the plant has sufficient room to grow and receives fresh nutrients. Repotting is an important part of care and helps keep the fern healthy.
When to repot a Boston fern?

Crawling Ferns
Do you want to propagate your curly fern? This can easily be done by dividing the root ball. Boston ferns do not produce cuttings like some other plants, but can be easily divided using this method. This is an effective way to grow new plants and keep your fern healthy by giving it some extra space.
When and why to propagate a Boston fern?
How do you propagate a Boston fern?
Extra tips for successful cuttings:
With proper care, your cuttings will take root quickly and grow into beautiful new ferns!

Curly Fern Toxic
Good news for pet owners: as far as is known, the curly fern is not toxic to cats and dogs. So you don't need to worry if your cat occasionally nibbles on the leaves. Although the plant is not toxic, it is still better to prevent pets from eating it, as large quantities of leaves can cause digestive problems. Additionally, it is good to keep in mind that some pets can damage the plant by pulling or chewing on it, which can affect the health of the fern.
Pruning the Curly Fern
Curly ferns generally require little pruning, but it is useful to do a little maintenance every now and then. Regularly remove old, brown, or withered leaves to keep the plant looking fresh and healthy. Use sharp, clean scissors and cut the leaves off close to the base of the plant. This not only enhances the aesthetics but also stimulates new growth. Moreover, pruning helps keep the plant in shape and prevents it from looking untidy due to wilted leaves.
Curly Fern Diseases
In general, the curly fern is a strong plant that rarely suffers from diseases, but sometimes it can experience a few problems. The most common are:
By paying close attention to watering and humidity, you can usually prevent these problems and keep your Boston fern healthy and strong!

My Boston fern Has Brown Leaves
Brown leaves on a Boston fern can have various causes. It is important to identify the cause to restore the plant:
-
Too much or too little water: Too much water can lead to root rot, while too little water dries out the plant. Check that the soil is evenly moist and adjust your watering so that the roots do not sit in water or dry out.
-
Air too dry: Curly ferns love high humidity. In a dry environment, the leaves may develop brown edges. Increase the humidity by regularly spraying the leaves or using a humidifier.
-
Direct sunlight: Curly ferns do not thrive in direct sunlight, which can burn the leaves and cause brown spots. Place the plant in a spot with indirect light or partial shade to prevent damage.
By checking and adjusting these factors, you can often remedy the brown leaves and keep your Boston fern healthy again.
Bonus Fern Loses Leaves
If your Boston fern is losing leaves, this can have several causes. It is important to monitor and adjust the conditions:
-
Too little water: Boston ferns like evenly moist soil. If the soil is too dry, the plant may drop its leaves. Ensure that the soil remains slightly moist, but prevent the roots from standing in water.
-
Dry air: Boston ferns need high humidity. If the air is too dry, the leaves may wilt and fall off. Spray the leaves regularly with water or use a humidifier to increase the humidity.
-
Too little light: If your Boston fern does not get enough light, this can lead to leaf loss. Place the plant in a brighter spot, but avoid direct sunlight, as this can burn the leaves. Indirect light is ideal for a Boston fern.
By monitoring and adjusting these factors, you can prevent leaf loss and allow your plant to recover.

With proper care, your Boston fern will remain healthy and beautiful for years! Follow these tips and enjoy a lush, green houseplant.
Too much or too little water: Too much water can lead to root rot, while too little water dries out the plant. Check that the soil is evenly moist and adjust your watering so that the roots do not sit in water or dry out.
Air too dry: Curly ferns love high humidity. In a dry environment, the leaves may develop brown edges. Increase the humidity by regularly spraying the leaves or using a humidifier.
Direct sunlight: Curly ferns do not thrive in direct sunlight, which can burn the leaves and cause brown spots. Place the plant in a spot with indirect light or partial shade to prevent damage.
Too little water: Boston ferns like evenly moist soil. If the soil is too dry, the plant may drop its leaves. Ensure that the soil remains slightly moist, but prevent the roots from standing in water.
Dry air: Boston ferns need high humidity. If the air is too dry, the leaves may wilt and fall off. Spray the leaves regularly with water or use a humidifier to increase the humidity.
Too little light: If your Boston fern does not get enough light, this can lead to leaf loss. Place the plant in a brighter spot, but avoid direct sunlight, as this can burn the leaves. Indirect light is ideal for a Boston fern.


