Making a Moss Stick
, 8 min reading time
, 8 min reading time
Do you have houseplants in your home that grow in every direction except upwards? Many popular plants are naturally climbers that grow towards the light via tree trunks in the rainforest. By making a moss pole yourself, you give these mosstok planten the support they need to grow bigger and stronger. It is a simple and sustainable way to take your urban jungle to the next level.

Although you can buy them ready-made in the store, making a moss pole yourself offers significant advantages. You have complete control over the dimensions, so the pole fits the size of your pot and the height of your plant exactly. Additionally, you can choose high-quality materials such as real Sphagnum moss, which often retains moisture much better than standard commercially available coconut fiber poles. This allows the plant's aerial roots to penetrate more easily and absorb more nutrients.
Using a moss pole is more than just decorative; it is essential for the health of your climber:
Larger leaves: As soon as a plant notices that it is climbing steadily upwards, it often produces larger leaves (and in the case of a Monstera, more notches).
Extra nutrition: The aerial roots grow in the moist moss and thus absorb extra water and nutrients directly from the stick.
Instead of growing wide, you force the plant to grow upwards, which is ideal for smaller rooms.
Natural look: A stick covered with real moss gives your interior a much more natural and luxurious look than a bare stick or a plastic rack.
Making a moss stick is a meticulous job, but with the right step-by-step plan, it is achievable for everyone. The secret lies in the firmness of the core and the moisture content of the moss during processing.
Preparation: Place the dried Sphagnum moss in a bucket with lukewarm water and let it soak for at least 20 minutes. Then squeeze the moss until it is still damp, but no longer dripping.
Placing the core: Take your core (for example, a PVC pipe) and determine which part will go into the ground. Leave this part (approximately 15-20 cm) bare, because moss rots quickly underground.
Applying the moss: Lay a layer of moss around the stick. Start at the top and work your way down. Ensure a layer of approximately 2 to 3 centimeters thick for good root grip.
Securing: Wrap the fishing line or jute twine tightly around the moss. Do this in a criss-cross pattern (zigzag) from top to bottom and back up again. Pull it tight so that the moss does not sag when it dries later.
Finishing: Check that there are no holes in the covering and trim away any loose blades of moss for a neat result.

A sturdy core: For example, a PVC pipe, a bamboo stick, or a wooden slat (be sure to treat wood against rot).
Filling: Dried Sphagnum moss (soak this in water beforehand) or high-quality coconut fiber.
Attachment: Fishing line (invisible), thin iron wire, or jute twine (natural look) to secure the moss.
Plastic mesh (optional): For a luxury version, you can wrap fine mesh around the core to better hold the moss in place; You often see this with professional 'moss poles'.
Once the pole is ready and standing firmly in the pot (preferably during repotting), you must carefully guide the plant. This is a precise process in which you force the growth in the right direction:
Place the moss pole as close as possible to the main stem of the plant.
Identify the 'nodes' (the thickenings on the stem where the leaves and aerial roots emerge). These must lie directly against the moss.
Use soft material to secure the stems, such as special plant Velcro or strips of an old pair of tights. Never use thin wire directly on the stem; This can 'saw through' the plant as it gets thicker.

Not every plant needs support, but for the following species it is an absolute game changer:
Monstera Deliciosa & Adansonii, these Monstera species are perhaps the best-known users of the moss pole. In the rainforest, these plants climb meters high along trees to reach sunlight; without support, the stems will creep along the ground and the leaves will remain small. By guiding them upwards, you stimulate the formation of the iconic large leaves with deep indentations and holes (fenestrations), which gives the plant its characteristic tropical appearance.
Philodendron, the Philodendron family contains countless climbing species such as the Scandens, Verrucosum or the popular Pink Princess that benefit enormously from a moss pole. Because these plants produce very active aerial roots, they can firmly grip the moist moss, which promotes sap flow to the leaves. As a result, the plant not only grows faster in height, but you also prevent the leaves at the bottom of the plant from shrinking or falling off over time.
Syngonium, the Syngonium plants are often sold as small, bushy plants, but they are naturally true climbers that produce long tendrils. When you grow a Syngonium along a moss pole, the plant takes on a much fuller and more compact appearance because the leaves develop closer together. Moreover, in mature climbing specimens, you often see the leaf shape change into an impressive, multi-lobed structure that you almost never see in trailing varieties.
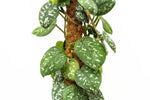
Scindapsus (Epipremnum), these Scindapsus species (also called Dragon Ivy) are kept as trailing plants in most homes, but they are originally vertical climbers. When the aerial roots of the Scindapsus take hold of a moist surface, a morphological change occurs: the leaves can grow up to three times larger than those of a hanging specimen. This creates a spectacular effect where the small heart-shaped leaves transform into enormous, glossy leaves that cover the entire pole.
Patience is a virtue when planting moss poles. On average, it takes 4 to 8 weeks before the aerial roots have truly settled into the moss. This process goes considerably faster if you spray the moss with water daily or every other day using a plant sprayer. As soon as the plant has taken hold, you will notice that the new leaves growing on top are immediately larger and stronger.
One of the biggest challenges is a plant that grows above its pole. With a homemade PVC moss pole, you can simply use a connector to attach an extra tube. With wooden cores, you can attach a new pole to the back of the old pole with sturdy cable ties or wire. Then wrap the new connection with moss again to make it one whole.

With a homemade moss pole, you give your houseplants the natural environment they deserve. The result is a healthier, larger plant that really steals the show in your interior. Don't feel like getting your hands dirty or are you looking for a quick solution? Of course, you can also always choose to buy a beautiful plant with moss pole directly. Then all the hard work has already been done for you, and you can immediately enjoy a climbing eye-catcher!


