5% off with code HELLO5
Cordyline Care
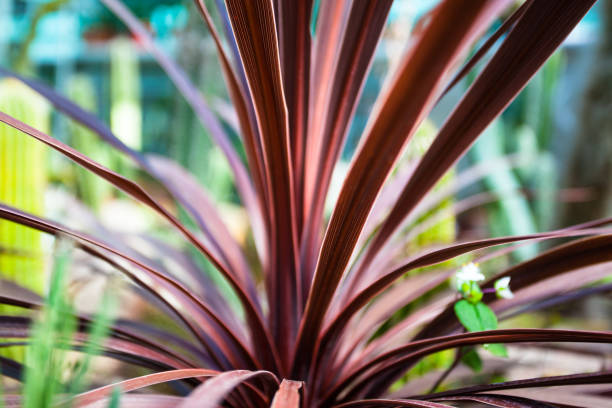
The Cordyline (or Cabbage Palm) has secured a firm place in the world of houseplants in recent years, and not without reason. Originally from the tropical rainforests of New Zealand and Brazil, this plant belongs to the Asparagus family and is known for its striking and decorative leaves. From the green varieties to the spectacular red and pink leaves, the Cordyline offers a wide range of aesthetic possibilities for your interior. Among the various species, such as the popular Red Star and Peko, some are better suited for indoor conditions than others. The Cordyline Red Star is hardy and suitable for outdoor spaces. The other species are suitable as houseplants. This care blog offers extensive advice for the houseplant variety to ensure that your green friend stays in top condition.
Cordyline Varieties
Cordyline Red Star and Cordyline Peko are two popular varieties of Cordyline that each have their own unique characteristics. The Red Star stands out for its vibrant red leaves that add a dramatic accent to any garden or room. The Peko, on the other hand, has a more subtle appearance with narrow, light green leaves that add a refined touch to your interior. Both species have specific care requirements, but also share some general care principles.
Watering Cordylines
Watering your Cordyline is crucial for its health and growth. Too much or too little water can lead to problems such as root rot or drying out. It is important to understand how to find the right balance to keep your Cordyline in top condition.
How Often to Water Cordyline?
The frequency of watering depends on various factors such as the size of the pot, the season, and light conditions. In spring and summer, when the plant is actively growing, you should check the potting soil regularly and water as soon as the top layer feels dry. In the autumn and winter, when growth slows, you can reduce watering.
Missing Cordyline
Missing can be useful to increase the humidity around your Cordyline, especially in drier environments. Use a plant sprayer to spray the leaves regularly, especially during the winter months when the air in the house can be drier. This helps to improve humidity and prevents the leaves from drying out.
Cordyline Location
The location of your Cordyline plays an important role in the overall health of the plant. The right location ensures optimal growing conditions and prevents problems such as wilting or disease.
Cordyline Light Conditions
Cordylines need plenty of bright, indirect light to grow well. Place your plant near a window with filtered light, but avoid direct sunlight that can burn the leaves. In insufficient light, the leaves may wilt and the colors may be less vibrant.
Cordyline Temperature
Cordylines prefer warm temperatures between 18°C and 25°C. Ensure that the plant is not exposed to cold drafts or temperature fluctuations, which can lead to stress or damage to the leaves.
Can the Cordyline Stand Outside?
Cordylines can be placed outside temporarily during the warmer months, but only if the temperature consistently remains above 15°C. Protect the plant from direct sunlight and weather conditions such as wind and rain. In colder seasons, you must bring the plant back indoors. The Cordyline Red Star, on the other hand, is winter hardy. The Cordyline 'Red Star' thrives best in well-draining soil and can be placed in both full sun and partial shade. This hardy plant can withstand temperatures down to -10°C and requires little maintenance. The only thing you need to do is prune occasionally to maintain the desired shape.
Repotting Cordyline
Repotting is an essential care step for your Cordyline to ensure healthy root development and strong growth. Regular repotting prevents the plant from being stunted by a pot that is too small and provides the necessary space for the roots to expand. Here are some important steps and tips for successfully repotting your Cordyline.
When to Repot Cordyline?
Your Cordyline needs to be repotted when you notice the roots growing through the drainage holes of the pot or if the plant shows signs of growth stagnation. This usually happens every 1 to 2 years, depending on the growth rate and the size of the plant. Spring is the best time to repot, because the plant is then in an active growth phase and will recover faster from the move.
How to Repot Cordyline?
-
Preparation: Choose a pot that is approximately 2-5 cm wider than the current pot. Ensure that the new pot has drainage holes to prevent waterlogging. Prepare a well-draining potting mix, such as a combination of general-purpose potting soil and perlite or sand.
-
Remove the Plant: Carefully remove your Cordyline from its current pot. Gently tap the sides of the pot to loosen the roots and carefully pull the plant out of the pot. If the roots are very compact, use a clean knife to cut them loose.
-
Inspect the Roots: Check the roots for signs of rot or disease. Remove damaged or rotten roots with a sterile knife or scissors. This helps keep the plant healthy and prevents further problems.
-
Place in the New Pot: Add a layer of potting soil to the bottom of the new pot. Place the Cordyline in the center of the pot and fill the space around the roots with potting soil. Lightly press down the soil to remove air bubbles and ensure the plant is at the same depth as before.
-
Watering: Water your Cordyline thoroughly immediately after repotting to allow the soil to settle and help the roots recover. Ensure that excess water can drain away properly and avoid letting the plant remain too wet.
-
After Repotting: Place your Cordyline in a spot with bright, indirect light and avoid direct sunlight for the first few weeks. This helps the plant adapt to its new pot without extra stress.
Maintenance After Repotting Cordyline
- Check Regularly: Keep a close eye on the plant during the first few weeks after repotting. Watch for signs of stress, such as wilting or discoloration of the leaves, and adjust care if necessary. Nutrition: Wait approximately 6-8 weeks after repotting before you start fertilizing. This gives the plant time to establish itself without excessive nutrient load. By regularly repotting your Cordyline, you ensure a healthy root environment and stimulate the plant's overall growth. With the right care and attention, your Cordyline remains a beautiful and vibrant addition to your interior.
Fertilizing Cordyline
Fertilization plays a crucial role in the health and vitality of your Cordyline. A good feeding schedule supports the plant during its growth phase, promotes strong leaves, and can even improve the color and overall appearance. Here are some guidelines and tips for effectively fertilizing your Cordyline.
When to Fertilize Cordyline?
- Growing Season: The best time to fertilize your Cordyline is during the growing season, which runs from spring to early autumn. During this period, the plant is active and requires extra nutrients to promote healthy growth. Winter months: During the winter months, the plant is in a dormant period and growth slows down. Fertilization is usually not necessary during this period and can even be harmful if the plant is not actively growing.
Which Fertilizer to Use for Cordyline?
- Balanced Fertilizer: Use a balanced fertilizer with an even ratio of nitrogen (N), phosphorus (P), and potassium (K), such as a 10-10-10 formula. This provides the plant with all the essential nutrients needed for healthy growth.
- Liquid Fertilizer: Liquid fertilizers are easy to apply and can be absorbed directly by the roots. Follow the instructions on the packaging for the correct dosage.
How to Fertilize Cordyline?
-
Preparation: Ensure that the potting soil is slightly moist before you start fertilizing. This prevents the roots from being damaged by an overly concentrated fertilizer.
-
Application: Mix the fertilizer with water according to the directions on the packaging. Pour the solution evenly over the potting soil, ensuring that the fertilizer does not come into direct contact with the plant stems or leaves.
-
Frequency: Fertilize your Cordyline every 4-6 weeks during the growing season. This keeps nutrient levels balanced without overdoing it, which can lead to salt buildup and root damage.
Tips and Precautions Fertilizing Cordyline
- Preventing Over-Fertilization: Too much fertilizer can lead to a buildup of salts in the potting soil, which can be harmful to the roots and the overall health of the plant. Adhere to the recommended dosage and frequency.
- Recognize Signs of Deficiency: If you notice that the leaves of your Cordyline are turning yellow or wilting, this may be a sign of a nutrient deficiency. Adjust your fertilization routine and check if you are providing the right nutrients. Alternative Options: Consider using slow-release fertilizers that release nutrients to the plant gradually. This can help ensure a constant supply of nutrients without over-fertilization.
By fertilizing your Cordyline correctly, you support healthy growth and a beautiful appearance. With the right care and nutrition, your plant remains vibrant and well-cared for, which contributes to its overall health and beauty.
Cordyline Potting Soil
Choosing the right potting soil is essential for the well-being of your Cordyline. Well-draining potting soil ensures optimal root health and prevents problems such as root rot. Below you will find everything you need to know about choosing and using potting soil for your Cordyline.
What is the Best Potting Soil for Cordyline?
1. Well-draining Mix: Cordylines need potting soil that is well-draining to drain excess water and prevent root rot. An ideal potting soil mix for Cordyline consists of a combination of general-purpose potting soil with additives such as perlite or sand. These additives improve drainage and air circulation around the roots.
2. Potting soil mixtures:
How to Use Potting Soil for your Cordyline?
1. Preparation: Mix your potting soil mixture well before placing it in the pot. Ensure that all ingredients are evenly distributed to guarantee a consistent texture and drainage capacity.
2. Potting and Repotting:
- New Pot: When repotting your Cordyline, fill the new pot to about one-third with the prepared potting mix. Carefully place the plant in the center and fill the rest of the pot with the mixture. Lightly press down the soil to remove any air bubbles.
- Support: After repotting, check that the plant is standing upright and add extra potting soil if necessary to ensure the roots are well covered.
3. Maintenance: Regularly check the potting soil to see if it remains well-drained and is not too wet or too dry. Adjust your watering based on the condition of the soil. Well-draining potting soil helps prevent problems such as root rot and other related diseases.
Tips for Choosing Potting Soil
- Quality: Invest in high-quality potting soil mixes from reliable brands to ensure a good foundation for your Cordyline.
-
pH value: Cordylines require a slightly acidic to neutral pH value (6.0 to 7.0). If possible, check the pH value of your potting soil mixture to ensure it is suitable for your plant.
By choosing and applying the right potting soil, you lay a solid foundation for the health and growth of your Cordyline. A well-draining mixture ensures that your plant can perform optimally and makes a beautiful addition to your interior.
Cordyline Cuttings
Taking cuttings is a popular and effective method to propagate your Cordyline and create new plants. The process is relatively simple and can help you expand your green collection or share new plants with friends and family. Below you will find a step-by-step guide for successfully propagating your Cordyline.
When to Propagate Cordyline?
- Best Time: The ideal time to propagate Cordyline is in the spring or early summer. During these periods, the plant is actively growing, which increases the chance of successful root formation.
How to Propagate Cordyline?
1. Choose a Healthy Branch:
- Select a healthy, mature Cordyline branch that is at least 10-15 cm long and has a few leaves. Avoid branches showing signs of disease or pests.
2. Cut Off the Branch:
3. Remove the Lower Leaves:
4. Use Root Stimulator (Optional):
5. Place in Water or Potting Soil: 6. Care after Cuttings: 7. Transplanting:
Tips for Successful Cordyline Cuttings
- Keep the Cuttings Clean: Ensure that your tools and pots are clean to minimize the risk of infections.
- Patience: It may take several weeks for the cuttings to start forming roots and be ready to be transplanted. Patience is important for successful propagation.
By following these steps, you can successfully grow new Cordylines and enjoy an expansion of your plant collection. Taking cuttings is not only a cost-effective way to get new plants, but also a satisfying way to exercise your green thumb and enjoy the growth of your plants.
Cordyline Toxic
The sap of the Cordyline can be toxic if ingested, which can cause problems such as nausea or vomiting. Therefore, be careful with curious pets, such as cats, or small children who might nibble on the leaves. Ensure the plant is out of their reach to prevent accidents.
Cordyline Pruning
Pruning is an important aspect of maintaining your Cordyline, especially to keep the plant healthy and attractive. It helps promote sturdy growth, remove dead or damaged parts, and maintain the desired shape. Below you will find a guide for effectively pruning your Cordyline.
When to Prune Cordyline?
- Best Time: The ideal time to prune your Cordyline is in the spring, just before the start of the growing season. This helps the plant to develop new shoots and grow healthily in the spring and summer. Pruning can also be done lightly in the summer to keep the plant in shape.
How to Prune Cordyline?
-
Preparation: Ensure that your pruning tools, such as sharp pruning shears or a clean knife, are thoroughly cleaned and disinfected to prevent infections.
-
Inspect the Plant: Look closely at your Cordyline and Identify dead, damaged, or unwanted branches and leaves. It is also a good time to check for any unwanted shoots that could affect the aesthetics or growth of the plant.
-
Prune Dead and Diseased Branches: First, remove the dead or diseased branches by cutting them off at the base. This helps keep the plant healthy and prevents the spread of diseases.
-
Shape and Shaping: Prune the branches that have become too long or do not maintain the desired shape of the plant. Cut the branches back to just above a node (the point where a leaf or side branch grows out of the branch) to promote neat, full growth.
-
Remove Unwanted Shoots: If there are new shoots that do not fit the shape you want to maintain, cut these away as well. This helps the plant focus its energy on the most important branches and leaves.
Maintenance After Pruning Cordyline
-
Water and Nutrition: Give your Cordyline some extra water after pruning to aid in recovery. You can also consider light fertilization to support the plant in growing new shoots.
-
Check the Plant: Keep a close eye on the plant in the weeks following pruning for any signs of stress or disease. Ensure the plant receives sufficient light and adjust watering based on the plant's needs.
Tips for Successful Cordyline Pruning
- Do Not Overdo It: Do not prune more than a third of the plant at a time to avoid excessive stress. Pruning too much can weaken the plant and slow down growth.
- Regular Maintenance: Regular pruning, approximately once a year, helps keep your Cordyline in top condition and ensures it always looks its best.
By pruning your Cordyline correctly, you promote healthy growth and maintain an attractive shape. With a little care and attention, your Cordyline remains a beautiful and vibrant addition to your interior.

Door je Cordyline met de juiste zorg en aandacht te behandelen, kun je genieten van een gezonde, levendige plant die een tropische flair aan je interieur toevoegt. Met deze gids heb je alle informatie die je nodig hebt om je Cordyline in topconditie te houden.


